
Tagged: woodworking
Resource: Lumberjocks.com
 Lumberjocks.com is great for general inspiration, for getting new project ideas, and for discovering and learning new techniques. The highlight, most certainly, is the “Projects” area where users share pictures and descriptions of things they’ve built. These range from rings and pendants to entire kitchens and caskets, so definitely there’s something for everyone. Some of the posts have little more that a couple of photos, while a few contain detailed write-ups about materials, tools and techniques that can be invaluable.
The site also does a very good job of making someone with only a Dremel and a couple of handsaws feel hopelessly outclassed, and it can make an itch for e.g. a band saw darn near uncontrollable. You’ve been warned!
Maori design

Maori bone fish hook
While browsing the interwebs for ideas and inspiration, I stumbled upon and was immediately captivated by Maori carvings. The smaller, simpler shapes, many of them clearly inspired by fishing hooks, were particularly interesting. They are very organic and natural, and somehow seem to both have and break symmetry at the same time. Their simplicity is deceptive – clearly, these were not based on a few haphazardly drawn lines, but carefully thought through or, rather, felt through. Continue reading
Guess what this is going to be
Here’s something that’s been in the works for a few days:

A cake stand? With stairs?
Made: Bento Box
 Oof, this was a long one! I originally uploaded my blueprint for this thing at the beginning of January, then reported some progress two weeks ago, after which it stayed idle. The second delay was mostly due to a shortage of raw materials – something that took longer to rectify than expected.
I am glad that I decided to build this box since it, more than any other thing I’ve made so far, really made me stop rushing forward with a “close enough is good enough” attitude. I wrote about that lesson in the post On the Importance of Precision – that title really sums it up. Continue reading
“Frame” earring rack
 My projects, it seems, come in groups. I started out with the Dremel 4000 by making a wooden ring and then went on to make two more in quick succession. More recently, I got going with the Bento Box and shortly after used the same mitre joining technique to make a kitchen tray. Today, I followed up on that with a third mitred frame, this one to serve as Mari’s earring rack.
The idea for this came from browsing Pinterest: there, someone had bought a picture frame, strung two or three lines of wire across it, and used those to hang necklaces and earrings. The only thing that was different about my version was that the frame was not store-bought but made out of 3.5cm-wide wooden corners: exactly the same approach as I used for the frame of the Bento Box. The frame is roughly 25 × 35 cm, with 45° cuts joined up to make square corners. The last two times I made mitred cuts, I did so with my own flimsy and undersized mitre box. This time, things went infinitely faster and smoother thanks to the fact that I had spent €9 on a mitre box / saw set.
Resource: woodsmithtips.com
 Here’s something else I thought might make for a useful category of posts – pages that I have found to contain practical and interesting info for an amateur Dremel-er / woodworker / handyman / etc. First up, for no other reason than I have found it most recently, is woodsmithtips.com. Put together by Woodsmith and ShopNotes magazines, this is a site with frequently published tips and tricks for those working with wood. The current pair of tips concern trimming wood plugs with a block plane and keeping one’s chisels sharp – neither is particularly useful for me at the moment, as I have neither a block plane nor a single chisel, but interesting to see nonetheless. It is possible to subscribe to receive future tips by email.
Note: When I was browsing the site a few days ago, I somehow managed to access the index of past tips, but now can’t figure out how I did it. If you find the way, please share!
Crack your knuckles, it’s finger joint time!

A finger (box) joint
After writing about mitre joints yesterday, I had a look at Wikipedia’s Woodworking joints page to educate myself a bit more. The dovetail joint, which I am still very keen to try, does seem to be rather advanced, as evidence by this quote:
…the cutting of dovetails by hand is regarded as a mark of skill on the part of the craftsperson.
So today, not being entirely confident in my masterful skills, I settled for the dovetail’s simpler counterpart – the finger joint. Also known as a box joint, thanks to its extensive use in boxes, drawers, etc., the finger joint aptly suits its name its name by resembling interlocked fingers of two hands.
The theory here is not overly complicated: sets of “fingers” are cut into the edges of the two abutting pieces, their depth corresponding to the material’s thickness. On one piece, the fingers are offset with respect to the other, so that the fingers “entwine” when the two pieces are put together. Continue reading
Quick weekend project: kitchen tray

A mitre joint
Saturday was cold, with the temperatures hovering below -20°C, so our little family hunkered down and stayed warm inside. Between doing some creative math with Des, watching a movie, enjoying Mari’s cooking, and taking a family nap, there was just enough time for me to make a little something for our kitchen. Until now, we’ve had our oil and vinegar bottles and other miscellany sit in an old shoe box lid on a kitchen counter. Replacing this storage solution with something a little nicer and sturdier has been on the “To Do” list for a while.
The half-finished Bento Box had given me a pretty good primer on making a rectangular frame, although this time everything was done with 4mm plywood. Unlike the Bento Box, the tray is long and narrow, over 60cm in length but only 20cm wide. Its sides are made out of 4.5cm-wide plywood strips that were fitted together with mitre joints. The same shaky little mitre box that I cobbled together a week ago, and almost threw out right after, came in very handy for cutting the 45° angles with a utility saw, though once again the 4.5cm plywood pieces were too tall for it and I had to eyeball the initial portion of every cut. Nevertheless, the final fit of the tray’s sides was pretty darn good. Continue reading
Yup, there’s yer problem!
Things have been a bit slow around here for the past couple of days. I ran out of raw material to finish the Bento Box, so it is lingering in a half-done state. Mari has just a few minutes ago commandeered it for “temporary” use as a tray for candles and other miscellany, and I have a shadow of a doubt as to whether it will ever become the originally-intended final product. Time will tell. I’ve also done one or two things in Des’s café, but they are too small to be honoured with a full post.
So, tonight, with only a little free time, no new ideas for another Blueprint, and nothing but plywood on hand, I took a few minutes to practice my sawing technique. On a strip of plywood around 4cm wide, I marked out 8 cuts 1cm apart and got to work with the jigsaw: Continue reading
Movable parts? You better believe it!
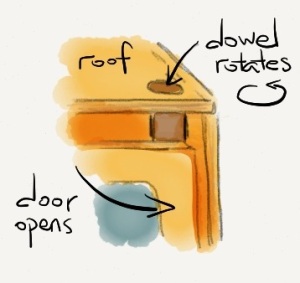
The refrigerator’s two doors would be attached to rotating dowels. Made with Paper
When the Hello Kitty café was finished, Des did a very good job of hiding her disappointment at the fact that the refrigerator’s doors didn’t open. While this wasn’t high on my list of things to do for the café, or in general, somehow Sunday morning found me pondering how to make it happen.
In my original café blueprint, I had an idea for making a swing door for the kitchen’s entrance, but I suspected that in this case that solution would tend to keep the fridge doors permanently open – no good. I briefly considered using small brad nails as pivots but, upon remembering my one attempt to hammer those into 4mm-thick plywood, that idea was discarded as well. Then, quite by chance, my glance fell on the 10mm wooden dowel and a new plan was born: I would attach the fridge doors to dowels, which would be inserted into holes in the fridge’s roof and floor. This way, the whole door / dowel assembly could rotate, with the dowel acting as the axis.
Without thinking ahead, I placed the dowel holes right next to the fridge’s walls, and paid for it later. Continue reading
